
Motorcycles are thrilling machines that offer freedom, speed, and adventure. However, mastering their controls is crucial for both safety and performance. Whether you’re a beginner or an experienced rider, understanding the various handlebars and switches is essential for smooth operation. In this comprehensive guide, we will explore everything about motorcycle controls, focusing on handlebars, switches, and how to optimize them for a better riding experience.
Table of Contents
Understanding Motorcycle Controls
Motorcycle controls are the interface between the rider and the machine. They consist of handlebars, switches, levers, and grips, all of which play a critical role in maneuvering the bike. Proper knowledge and setup of these controls enhance comfort, control, and safety while riding.
Importance of Motorcycle Controls
- Safety: Proper control ensures safe riding, especially in emergency situations.
- Comfort: Correct handlebar and switch placement prevent fatigue during long rides.
- Performance: Well-adjusted controls improve handling and responsiveness.
- Customization: Different handlebar types and switch setups cater to different riding styles.
Types of Motorcycle Handlebars
Handlebars come in various styles, each designed to serve different riding preferences. Here are some of the most common types:
1. Standard Handlebars
- Found on commuter and naked bikes.
- Provide an upright riding posture.
- Comfortable for everyday use.
2. Clip-On Handlebars
- Common in sports bikes and racing motorcycles.
- Positioned lower for an aggressive riding stance.
- Improves aerodynamics and cornering stability.
3. Ape Hanger Handlebars
- Popular on cruisers and choppers.
- High positioning requires extended arms.
- Offers a stylish look but can be uncomfortable on long rides.
4. Drag Bars
- Found on custom and drag racing motorcycles.
- Low and straight for a forward-leaning position.
- Enhances acceleration and speed.
5. Z-Bars & T-Bars
- Used in custom-built motorcycles.
- Provide unique aesthetics and comfort balance.
6. Cruiser Handlebars
- Wide and slightly pulled back for relaxed riding.
- Ideal for long-distance touring.
How to Adjust Motorcycle Handlebars
Proper adjustment of handlebars is essential for a comfortable and safe ride. Here’s how you can do it:
Steps to Adjust Handlebars
- Loosen the Handlebar Clamps: Use an appropriate wrench to loosen the bolts holding the handlebars.
- Adjust the Angle: Position the handlebars to a comfortable angle for your arms.
- Tighten the Bolts: Once positioned correctly, tighten the bolts securely.
- Test for Comfort: Sit on the bike and ensure a natural grip without strain on the wrists.
- Check Clearance: Ensure the handlebars don’t hit the fuel tank when turning.
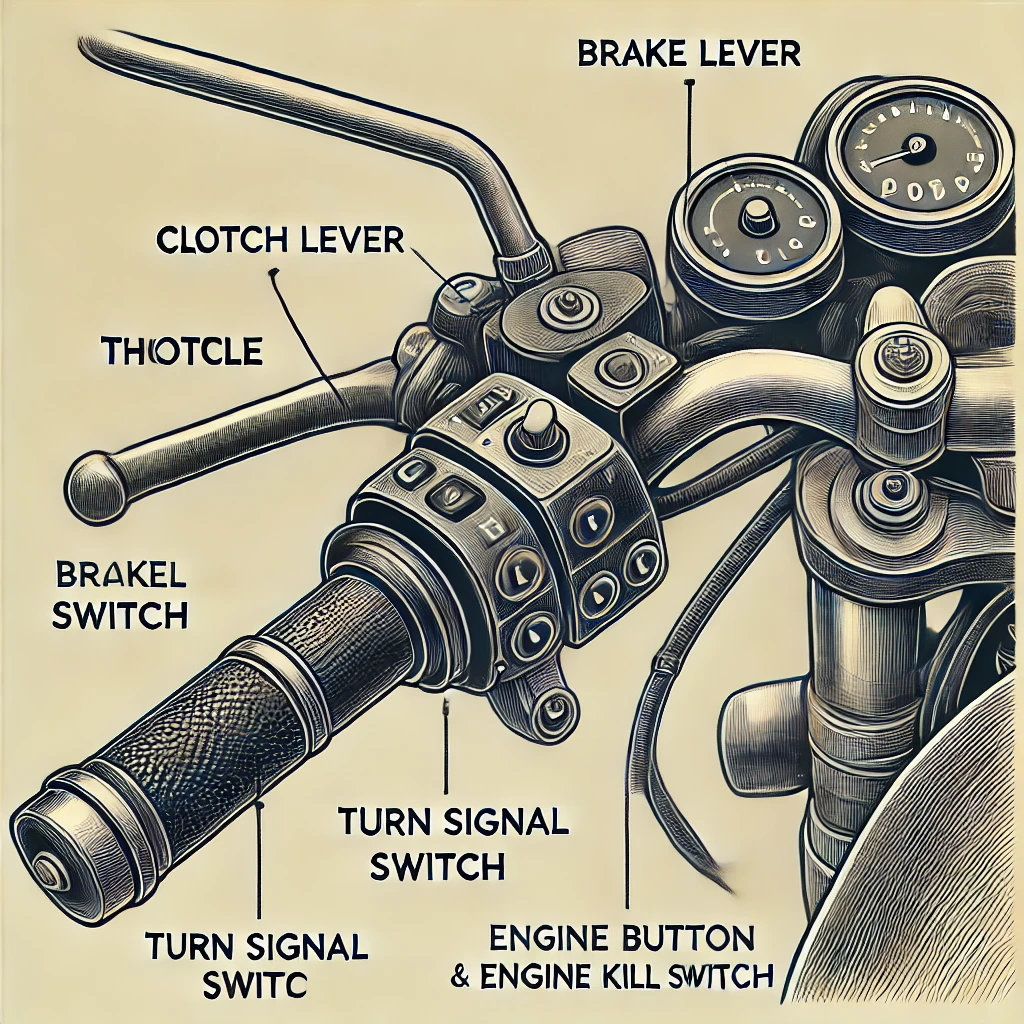
Motorcycle Handlebar Switches Explained

Motorcycle handlebar switches control various functions like lights, indicators, and engine operation. Here’s a breakdown of the key switches:
1. Throttle Control
- Located on the right handlebar.
- Controls engine power and speed.
- Must be operated smoothly for better fuel efficiency.
2. Front Brake Lever
- Positioned on the right handlebar.
- Engages the front brakes.
- Should be applied progressively to avoid skidding.
3. Clutch Lever
- Located on the left handlebar.
- Used for shifting gears.
- Should be operated smoothly for seamless gear transitions.
4. Turn Signal Switch
- Usually found on the left handlebar.
- Used to indicate turning direction.
- Must be canceled after turning to avoid confusion for other drivers.
5. Horn Button
- Located on the left handlebar.
- Alerts pedestrians and other vehicles.
- Should be used responsibly.
6. Engine Kill Switch
- Positioned on the right handlebar.
- Instantly shuts off the engine in emergencies.
- Useful in situations like accidental throttle engagement.
7. High/Low Beam Switch
- Controls the intensity of the headlight.
- High beam for long-range visibility, low beam for city riding.
8. Hazard Light Switch (if equipped)
- Turns on both indicators for emergency warning.
- Helps in roadside breakdown situations.
Best Motorcycle Controls Setup
Setting up your motorcycle controls correctly improves your riding experience. Here are some expert tips:
Handlebar Positioning
- Adjust handlebars for a relaxed arm position.
- Ensure hands align with shoulders for natural grip.
- Avoid excessive forward or backward tilt.
Lever Adjustments
- Clutch and brake levers should be easily accessible.
- Set them at a slight downward angle for wrist comfort.
- Ensure proper resistance to avoid accidental engagement.
Throttle and Switch Sensitivity
- Keep throttle play minimal for better responsiveness.
- Ensure switches function smoothly without stiffness.
Foot Peg and Gear Shifter Setup
- Adjust foot pegs for easy leg movement.
- Ensure gear shifter is at a comfortable reach.
Common Motorcycle Control Issues & Troubleshooting
Even well-maintained motorcycles can develop control-related issues. Here are some common problems and solutions:
1. Stiff Throttle Response
- Cause: Dirty or damaged throttle cables.
- Solution: Clean and lubricate throttle cables regularly.
2. Loose or Misaligned Handlebars
- Cause: Loose bolts or improper installation.
- Solution: Tighten handlebar bolts and realign if necessary.
3. Non-Responsive Switches
- Cause: Electrical wiring issues or worn-out buttons.
- Solution: Check wiring and replace faulty switches.
4. Brake Lever Feels Spongy
- Cause: Air in brake lines or worn-out brake fluid.
- Solution: Bleed the brakes and refill with fresh fluid.
5. Hard Clutch Pull
- Cause: Clutch cable needs lubrication or adjustment.
- Solution: Lubricate or replace the cable if necessary.
Conclusion
Mastering motorcycle controls, including handlebars and switches, is essential for safe and efficient riding. Whether you’re adjusting your handlebars for better comfort or understanding the functions of different switches, proper knowledge enhances both performance and safety. Regular maintenance and correct setup ensure a smooth and enjoyable riding experience.
By learning the ins and outs of motorcycle controls, riders can confidently handle their bikes, minimize fatigue, and maximize safety on the road. Keep your motorcycle well-tuned, and enjoy the ride!
For more motorcycle tuning tips and maintenance guides, visit MotorcycleTune.com! Mastering Motorcycle Controls: A Complete Guide to Handlebars & Switches
Motorcycles are thrilling machines that offer freedom, speed, and adventure. However, mastering their controls is crucial for both safety and performance. Whether you’re a beginner or an experienced rider, understanding the various handlebars and switches is essential for smooth operation. In this comprehensive guide, we will explore everything about motorcycle controls, focusing on handlebars, switches, and how to optimize them for a better riding experience.
Understanding Motorcycle Controls
Motorcycle controls are the interface between the rider and the machine. They consist of handlebars, switches, levers, and grips, all of which play a critical role in maneuvering the bike. Proper knowledge and setup of these controls enhance comfort, control, and safety while riding.
Importance of Motorcycle Controls
- Safety: Proper control ensures safe riding, especially in emergency situations.
- Comfort: Correct handlebar and switch placement prevent fatigue during long rides.
- Performance: Well-adjusted controls improve handling and responsiveness.
- Customization: Different handlebar types and switch setups cater to different riding styles.
Types of Motorcycle Handlebars
Handlebars come in various styles, each designed to serve different riding preferences. Here are some of the most common types:
1. Standard Handlebars
- Found on commuter and naked bikes.
- Provide an upright riding posture.
- Comfortable for everyday use.
2. Clip-On Handlebars
- Common in sportbikes and racing motorcycles.
- Positioned lower for an aggressive riding stance.
- Improves aerodynamics and cornering stability.
3. Ape Hanger Handlebars
- Popular on cruisers and choppers.
- High positioning requires extended arms.
- Offers a stylish look but can be uncomfortable on long rides.
4. Drag Bars
- Found on custom and drag racing motorcycles.
- Low and straight for a forward-leaning position.
- Enhances acceleration and speed.
5. Z-Bars & T-Bars
- Used in custom-built motorcycles.
- Provide unique aesthetics and comfort balance.
6. Cruiser Handlebars
- Wide and slightly pulled back for relaxed riding.
- Ideal for long-distance touring.
How to Adjust Motorcycle Handlebars
Proper adjustment of handlebars is essential for a comfortable and safe ride. Here’s how you can do it:
Steps to Adjust Handlebars
- Loosen the Handlebar Clamps: Use an appropriate wrench to loosen the bolts holding the handlebars.
- Adjust the Angle: Position the handlebars to a comfortable angle for your arms.
- Tighten the Bolts: Once positioned correctly, tighten the bolts securely.
- Test for Comfort: Sit on the bike and ensure a natural grip without strain on the wrists.
- Check Clearance: Ensure the handlebars don’t hit the fuel tank when turning.
Motorcycle Handlebar Switches Explained
Motorcycle handlebar switches control various functions like lights, indicators, and engine operation. Here’s a breakdown of the key switches:
1. Throttle Control
- Located on the right handlebar.
- Controls engine power and speed.
- Must be operated smoothly for better fuel efficiency.
2. Front Brake Lever
- Positioned on the right handlebar.
- Engages the front brakes.
- Should be applied progressively to avoid skidding.
3. Clutch Lever
- Located on the left handlebar.
- Used for shifting gears.
- Should be operated smoothly for seamless gear transitions.
4. Turn Signal Switch
- Usually found on the left handlebar.
- Used to indicate turning direction.
- Must be canceled after turning to avoid confusion for other drivers.
5. Horn Button
- Located on the left handlebar.
- Alerts pedestrians and other vehicles.
- Should be used responsibly.
6. Engine Kill Switch
- Positioned on the right handlebar.
- Instantly shuts off the engine in emergencies.
- Useful in situations like accidental throttle engagement.
7. High/Low Beam Switch
- Controls the intensity of the headlight.
- High beam for long-range visibility, low beam for city riding.
8. Hazard Light Switch (if equipped)
- Turns on both indicators for emergency warning.
- Helps in roadside breakdown situations.
Best Motorcycle Controls Setup
Setting up your motorcycle controls correctly improves your riding experience. Here are some expert tips:
Handlebar Positioning
- Adjust handlebars for a relaxed arm position.
- Ensure hands align with shoulders for natural grip.
- Avoid excessive forward or backward tilt.
Lever Adjustments
- Clutch and brake levers should be easily accessible.
- Set them at a slight downward angle for wrist comfort.
- Ensure proper resistance to avoid accidental engagement.
Throttle and Switch Sensitivity
- Keep throttle play minimal for better responsiveness.
- Ensure switches function smoothly without stiffness.
Foot Peg and Gear Shifter Setup
- Adjust foot pegs for easy leg movement.
- Ensure gear shifter is at a comfortable reach.
Common Motorcycle Control Issues & Troubleshooting
Even well-maintained motorcycles can develop control-related issues. Here are some common problems and solutions:
1. Stiff Throttle Response
- Cause: Dirty or damaged throttle cables.
- Solution: Clean and lubricate throttle cables regularly.
2. Loose or Misaligned Handlebars
- Cause: Loose bolts or improper installation.
- Solution: Tighten handlebar bolts and realign if necessary.
3. Non-Responsive Switches
- Cause: Electrical wiring issues or worn-out buttons.
- Solution: Check wiring and replace faulty switches.
4. Brake Lever Feels Spongy
- Cause: Air in brake lines or worn-out brake fluid.
- Solution: Bleed the brakes and refill with fresh fluid.
5. Hard Clutch Pull
- Cause: Clutch cable needs lubrication or adjustment.
- Solution: Lubricate or replace the cable if necessary.
Mastering Motorcycle Controls.
A Complete Guide to Handlebars & Switches
Conclusion
Mastering motorcycle controls, including handlebars and switches, is essential for safe and efficient riding. Whether you’re adjusting your handlebars for better comfort or understanding the functions of different switches, proper knowledge enhances both performance and safety. Regular maintenance and correct setup ensure a smooth and enjoyable riding experience.
By learning the ins and outs of motorcycle controls, riders can confidently handle their bikes, minimize fatigue, and maximize safety on the road. Keep your motorcycle well-tuned, and enjoy the ride!
For more motorcycle tuning tips and maintenance guides, visit MotorcycleTune.com! 🚀🏍️